[Top] [Prev] [Next] [Bottom] [Contents]

Sapphire/Web tools

Project Window

The Project Window is the center of the Sapphire/Web tool. It is the first visible window when the tool starts, and it can be used to control all aspects of the project. The Project Window is divided into 5 sections:

1. Menu Bar
2. Button Bar
3. Activators Area
a. Bound Activators
b. Activator Pop-Up Menu (MB3)
4. Selected Activators Button Bar
5. Message Window

Figure 1-1 Project Window

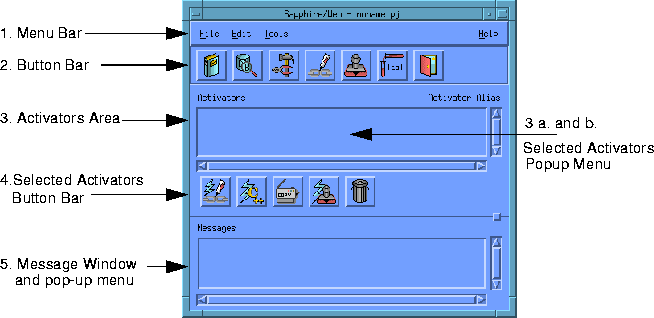
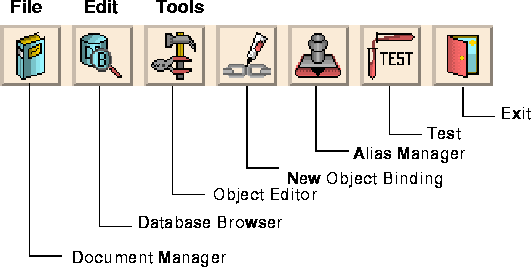
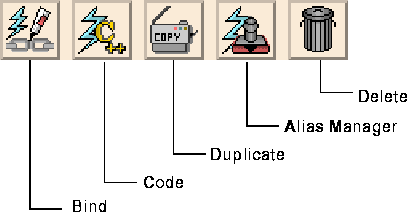
The icons have been defined in Figure 1-2 and Table 1-1.

Figure 1-2 The Main Button Bar

Table 1-1 Expanded Pulldown Menus

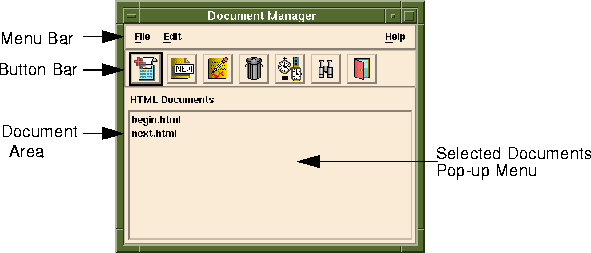
Other actions may be performed from the second-level Button Bar.

Figure 1-3 The Second-Level Button Bar in the Selected Activators

The Document Manager

The Document Manager allows the user to control the HTML Documents used in a project. From the Document Manager, the user can:

Figure 1-4 The Document Manager Menu and Button Bar

Figure 1-5 Document Manager Button Bar Detail

DB Browser

This option opens a window showing the database schema of any Sybase, Oracle or Informix database on the network. The following database components are displayed:


Figure 1-6 DB Browser


The DB Browser also features a Table Editor that Browses, Inserts, Updates and Deletes the data in the loaded table. This is invoked from Tools->Modify Table Data.

Object Editor

The Object Editor is used to create, modify, delete, and test Data Objects. It is much like a text editor, allowing you to Open, Edit, Save, and Close Data Objects. Objects are loaded into the Object Editor by using the Object Selector. Test results are displayed in the Object Results Viewer.

Figure 1-7 Object Editor

Object Type Selector

The Object Selector allows the developer to select Data Objects, Stored Procedures, and DSQL Objects requiring a network database server, a database, and an object name. These can all be selected from the Object Type combo box.

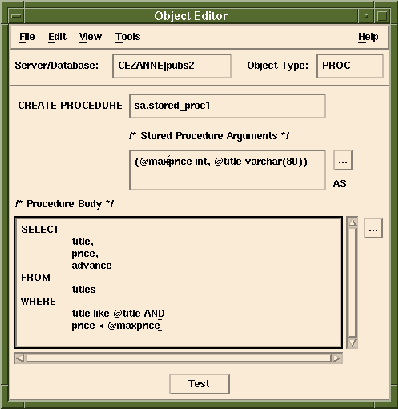
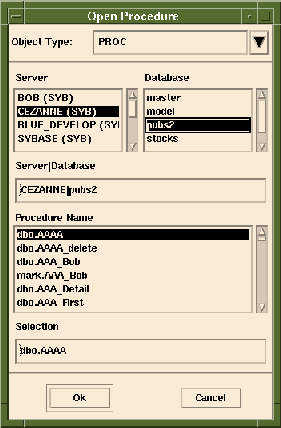
The Object selected is transferred to the editor that invoked it by clicking the Ok button.

Figure 1-8 Object Type Selector

Object Results Viewer

When Data Objects are tested from the Object Editor, the results are displayed in the Object Results Viewer. The data are displayed in a matrix of rows and columns.

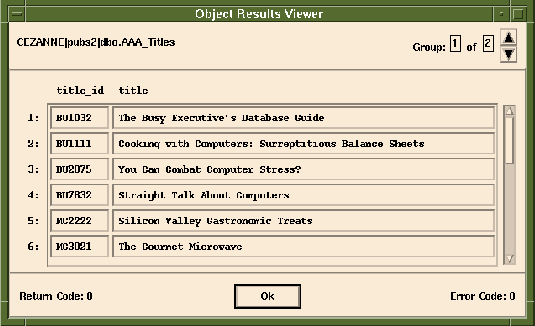
When using a Sybase database, if there is more than one select statement in the results set, the results are divided into groups which can be scrolled through with the Group spin box.

Return and Error Codes are displayed in the Object Results Viewer if data was returned from the tested Data Object. If there is no returned data, Return Code, Error Code and Rows Affected are displayed in a message box, and the Object Results Viewer is not used.

Click on Ok to dismiss this interface.

Figure 1-9 Object Results Viewer

Object Bind Editor

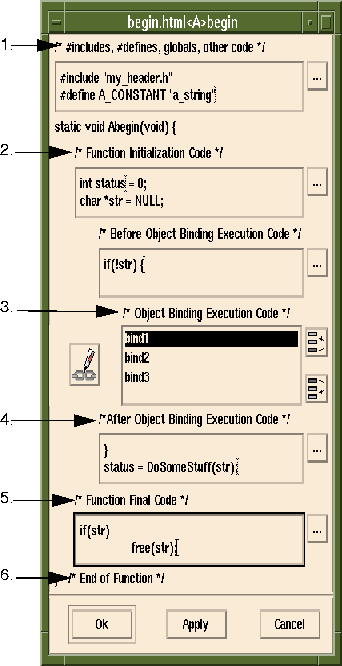
The Object Bind Editor is used to create Object Bindings. An Object Binding is the association made between a Data Object and a GUI Object.

This editor is divided into three parts:

Objects are loaded into the Object Bind Editor by using the Object Selector.

Figure 1-10 The Object Bind Editor

Results Detail Dialog

The Results Detail Dialog window allows the user to select Population Callbacks and specify how data will be inserted into a Template. If no Population Callback is selected, data is inserted in tabular format with no special HTML tag information. Custom Population Callbacks defined by the user are inserted in the Callback Combo Box. See the section on Population Callback Integration in the User's Guide. The user can define Population Callbacks that appear in the Callback combo box list which has context-sensitive Help.

Figure 1-11 Results Detail Dialog

The Results Detail Dialog can be invoked by pressing the Detail button in the Object Bind Editor's 
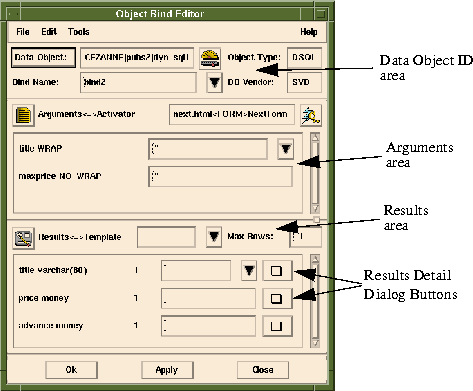
Results ->Template section.

Alias Manager

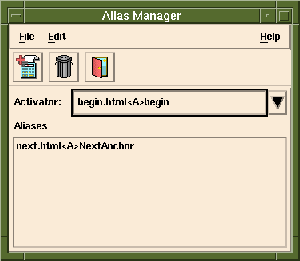
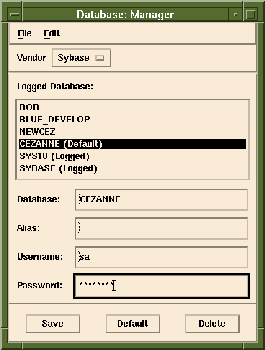
The Alias Manager is used to control project Aliases. Aliases can be added, deleted, and queried from the Alias Manager. The Alias Manager can be invoked from either the Project Window or from the Object Bind Editor. Remember that an Alias is a duplicate with all of the attributes of the original Activator. Therefore, an Alias cannot perform any functions other than those of its aliased Activator. If you need similar, but not identical, functionality, duplicate the Activator, then make changes to the duplicated Alias.

An Alias cannot be an independent Activator unless it is first deleted from the Alias Manager. An Alias can never be aliased to more than one Activator.

Figure 1-12 Alias Manager

Database Login Manager

The Database Login Manager allows the user to manage database logins during Sapphire/Web sessions. It is most often used to switch database users once you have prompted for a login.

Figure 1-13 Database Login Manager

Activator Selector

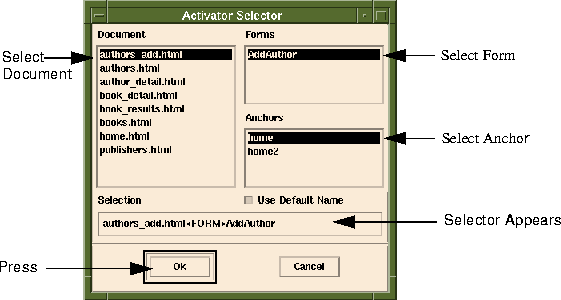
The Activator Selector is used to select Anchors for aliasing and binding. The Activator Selector allows the developer to select a Form (<FORM>) or Anchor (<A>) that has never been used in the project, give it a name, and mark it as a Sapphire/Web Activator. It can also select existing Activators when creating new Object Bindings.

When a Document is selected, all of the Forms and Anchors in that document are displayed in the respective list. Selecting, highlighting, and clicking the OK button in a Form or Anchor transfers it to the Selection field.

Before a Form is named, it looks like this in the Forms list:

ACTION=http://some_url or ACTION=some_name
Before an Anchor is named, it looks like this in the Anchor List:

HREF=http://some_url or HREF=some_name
The display for unnamed Forms and Anchors is determined by the content of the HTML document tag for that Form or Anchor.

If the Use Default Name toggle is chosen, an unnamed Anchor will attempt to use the name as is after the = sign. If the name is invalid, the user is prompted for a valid name. If the Use Default Name toggle is not chosen, the developer is prompted for a name every time a new Form or Anchor is selected as an Activator.

Figure 1-14 Activator Selector

Activator Code

The Activator Code interface allows the developer to add C/C++ code to Object Bindings and Activators. See "Generated Code" in the User's Guide for more information. There are six significant places that code can be added:

1. /* #includes, #defines, globals, other code */
This section allows the user to add code that is significant to the entire module. Any valid code can be added here.
2. /* Function Initialization Code */
This code is inserted at the top of the generated function and is associated with the Activator listed in the title bar of The Activator Code interface. Local variables can be declared here, as well as initial code.
3. /* Before Object Binding Execution Code */
This is code which gets executed immediately before the generated code for the selected Object Binding is executed.
4. /* Object Binding Execution Code */
This is a scrolled list of all Object Bindings associated with the Activator displayed in the title bar. When a binding is selected, the before and after code is loaded into the respective Activator Code sections, allowing the function developer to easily view the flow of the code. Pressing the button on the right of the Binding List reorders the way the bindings are executed. Pressing the button on the left brings up the Object Bind Editor for the selected Object Binding.
5. /* After Object Binding Execution Code */
This is code which is executed immediately after the generated code for a selected Object Binding is executed.
6. /* Function Final Code */
This code is executed after all Object Binding code has been executed. It is often used for cleaning up allocated memory. See Figure 1-15 for locations of the above steps previously discussed in the begin.html<A>begin screen.
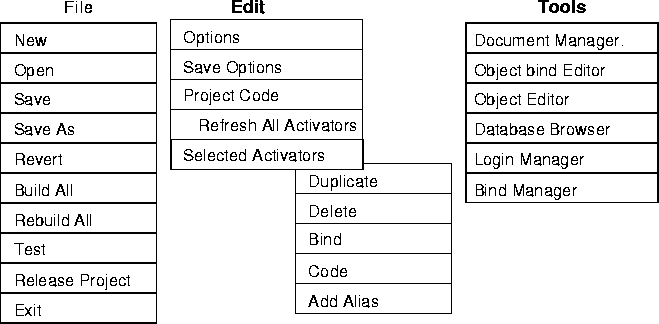
Figure 1-15 Activator Code

Project Options/Options Editor

The Project Options window allows you to change the default options with which Sapphire/Web is started. The Options Editor is used throughout the tool for different purposes. In this case it is used for setting Project Options. Project Options can be invoked from the Project Window's Edit->Options.

Figure 1-16 Options Editor

Project Code

From the Project Window select 
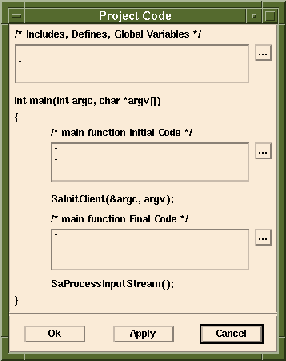
Edit-> Project Code Dialog. This interface provides a mechanism for adding C/C++ code to the module containing the function Main. There are three text areas of this window:

/* Includes, Defines, Global Variables */ 
Area for code that is to go before the function Main.
/* main function Initial Code */
Area for code that is to go before generated code in the function Main.
/* main function Final Code */
Area for code that is to go after generated code in the function Main.

Figure 1-17 Project Code

Each project has a C module generated named project_name.c. This is where the function Main resides as well as where function registry occurs.

Database Login Dialog

The Database Login Dialog pops up automatically whenever a Database Server with no Login information is accessed from anywhere in the tool. It is invoked automatically the first time Login information is needed by a Server or Database. This prompts for new Login information, and retains that information for the duration of the Sapphire/Web session.

Figure 1-18 Login Dialog


[Top] [Prev] [Next] [Bottom] [Contents]

info@bluestone.com
Copyright © 1997, Bluestone. All rights reserved.